近段时间遇到一个问题:有多个服务要放在一个主机上,但是想用域名来区分这些服务而不是端口号(就像IP地址一样,没有人愿意记端口号)。后面找到了Nginx配置反向代理这个解决方案,这里总结一下。
代理
一个Web应用的基本通信流程是:客户端(client)发送一个请求(request)给服务器(server),然后服务器根据请求返回相应的响应(response)给客户端。
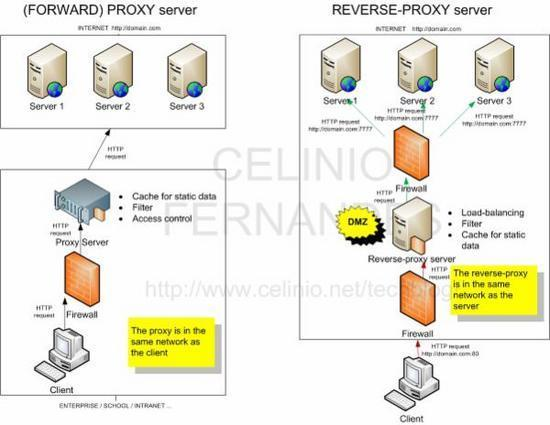
那么代理的作用就是让一个机器来替我们发送请求或者返回响应,在客户端替我们发送请求的代理称为正向代理;在服务器替我们接受请求返回响应的代理称为反向代理。
正向代理:client —(send request)—> clinet proxy –(send request)—> server
反向代理:clinet –(send request)–> server proxy –(send request)–>other server
Nginx 配置反向代理
使用Nginx配置反向代理需要用到的配置模块有http模块、server模块、location模块、upstream模块
http模块
http模块负责HTTP服务器相关属性的配置,它里面有server和upstream子模块
1 | http { |
server模块
为http模块的子模块,定义一个虚拟主机。
1 | server { |
upstream模块
负责负载均衡模块,通过一个简单的调度算法来实现客户端IP到后端服务器的负载均衡。
1 | upstream iyangyi.com{ |
解释:
- 通过upstream指令指定了一个负载均衡器的名称iyangyi.com。这个名称可以任意指定,在后面需要的地方直接调用即可。
- ip_hash这是其中的一种负载均衡调度算法,下面会着重介绍。
- 紧接着就是各种服务器了。用server关键字表识,后面接ip。
Nginx负载均衡模块支持的4种调度算法:
- weight 轮询(默认)。每个请求按时间顺序逐一分配到不同的后端服务器,如果后端某台服务器宕机,故障系统被自动剔除,使用户访问不受影响。weight。指定轮询权值,weight值越大,分配到的访问机率越高,主要用于后端每个服务器性能不均的情况下。
- ip_hash。每个请求按访问IP的hash结果分配,这样来自同一个IP的访客固定访问一个后端服务器,有效解决了动态网页存在的session共享问题。
- fair(第三方)。比上面两个更加智能的负载均衡算法。此种算法可以依据页面大小和加载时间长短智能地进行负载均衡,也就是根据后端服务器的响应时间来分配请求,响应时间短的优先分配。Nginx本身是不支持fair的,如果需要使用这种调度算法,必须下载Nginx的upstream_fair模块。
- url_hash(第三方)。按访问url的hash结果来分配请求,使每个url定向到同一个后端服务器,可以进一步提高后端缓存服务器的效率。Nginx本身是不支持url_hash的,如果需要使用这种调度算法,必须安装Nginx的hash软件包。
location模块
location模块使用来定位URL、解析URL的,指明定位到的URL的功能是什么。提供了强大的正则匹配功能,也支持条件判断匹配,用户可以通过location指令实现Nginx对动、静态网页进行过滤处理。
最简单的一个例子:1
2
3
4location / {
root /Users/yangyi/www;
index index.php index.html index.htm;
}
- location / 表示匹配根目录
- root 指令用于指定访问根目录时,虚拟主机的web目录
- index 用于设定我们只输入域名后访问的默认首页地址
当我们需要进行反向代理的时候,主要配置也是在这里的,其使用的是location模块下的proxy_pass选项:
1 | location / { |
解释:
- proxy_pass 指定反向代理的地址
- proxy_set_header 设置 HTTP 请求头,Accept-Encoding “” 表示拒绝任何压缩,这保证了服务器返回给反向代理的内容是未经压缩的,以便进行 URL 替换
- proxy_set_header 设置 HTTP 请求头,语言设置
- proxy_set_header 设置 HTTP 请求头,设置 UA
- sub_filter URL 替换
- sub_filter_once 被关闭,替换所有可替换的内容
反向代理作用
- 保护了真实的web服务器,web服务器对外不可见,外网只能看到反向代理服务器,而反向代理服务器上并没有真实数据,因此,保证了web服务器的资源安全
- 负载均衡,最大化服务器集群的效率
- 请求的统一控制,包括设置权限、过滤规则等;
例子
配置本地主机gist.example.com到github的gist.github.com的server模块配置如下:1
2
3
4
5
6
7
8
9
10
11
12
13
14
15
16
17
18
19server {
listen 80;
server_name gist.example.com;
access_log off;
resolver 8.8.8.8;
location / {
	proxy_pass          https://gist.github.com;
	proxy_cache_valid   200 302 1h;
	proxy_cache_valid   404 1m;
	proxy_cache_use_stale error timeout invalid_header updating
		http_500 http_502 http_503 http_504;
	proxy_set_header    Accept-Encoding "";
	proxy_set_header    Accept-Language "zh-CN";
	proxy_set_header    User-Agent $http_user_agent;
	sub_filter  https://gist-assets.github.com/ http://gist.example.com;
	sub_filter  https://gist.github.com/ http://gist.example.com;
	sub_filter_once     off;
}
}
- 井号开头的行是注释
- server 开始了 server 块
- listen 表明 Nginx 将会在 80 端口监听
- server_name 是我们给反向代理配置的域名,访问这个域名就相当于访问 Gist
- access_log 是日志文件的配置,这里为了简化我将它关掉了
- resolver 是 DNS 服务器
- location 块具体配置反向代理的行为
- proxy_pass 说明将会将请求转发至 Gist
- proxy_cache_valid 配置缓存
- proxy_cache_valid 同上
- proxy_cache_use_stale 同上
- proxy_set_header 设置 HTTP 请求头,Accept-Encoding “” 表示拒绝任何压缩,这保证了服务器返回给反向代理的内容是未经压缩的,以便进行 URL 替换
- proxy_set_header 设置 HTTP 请求头,语言设置
- proxy_set_header 设置 HTTP 请求头,设置 UA
- sub_filter URL 替换
- sub_filter 同上
- sub_filter_once 被关闭,替换所有可替换的内容